One reason why cupcakes are so much fun to serve at your kid’s birthday party.

Category Archives: Desserts
The Shiksa Does Passover, Part 2 – Almond Cake

In Part 1 of this series, I made a really good brisket that was not my mother-in-law’s recipe. This year, I decided to tackle dessert.
As anyone who has tried to make an unleavened dessert for Passover dinner knows, the words “baking” and “Seder” should probably not be used together in the same sentence, let alone a blog post. But dessert must be had at a Seder, and so an entire tradition of baked goods made without flour or leavening has evolved – cakes made with ground nuts, dense chocolate tortes and macaroons are traditional. (My mother-in-law Irene makes a fabulous strawberry shortcake every year using a light sponge cake made with ground nuts.)
This recipe is modified from one I found in Jewish Cooking by Marlena Spieler. The recipes in this marvelous book hail from both Sephardic and Eastern European Jewish traditions, and the pictures are gorgeous. The original recipe, Pesach Almond Cakes, has a bit more intense almond flavor than the one I’ve posted and calls for the creation of a thin icing made with confectioner’s sugar and brandy that is poured over the almost cooked cake, which is then returned to the oven while the icing crisps.
My first attempt at the original recipe was a fallen yet delicious failure that my friends Larry and Sally graciously served at their Seder with a large spoon. (I guess La Crueset lasagna pans are not meant for baking cakes…)
On my second attempt for Mr TBTAM’s family Seder, I used the right pan but the cake still fell a tad, so I just soaked the cake with some brandy and sprinkled the final product with confectioner’s sugar. It was delicious!
If you try the original recipe and it works perfectly, do let me know how you did it so I can figure out what I did wrong (probably too many years of Catholic schooling…) I’m thinking it may have been because I used the American measurements rather than the original metric ones, so I am posting only the metric units for you.
A few pieces of advice: (1) Don’t open the oven door to peek. (2) It may take longer than the stated time depending on your oven. Be sure the middle is set before you take the pan out to sprinkle the brandy on top. (3) Make sure the cake is really, really cooled before cutting it. (4) Finally, it will be difficult to get out the squares out of the pan unless you have a small cookie spatula, which I did not have, but Irene did.
Of course, the fact that this recipe needs so much advice only speaks to the difficulty of making unleavened baked goods. Then again, getting the Israelites out of Egypt was no small task…
Almond Cake for Passover
- 350 grams cups ground almonds
- 50 grams matzo meal
- ¼ tsp salt
- 30 ml vegetable oil (I used canola oil)
- 250 grams sugar
- 300 grams brown sugar
- 3 eggs, separated
- 1 tsp almond extract
- 1 tsp vanilla extract
- 150 ml orange juice
- 75 ml brandy for the batter
- 50-75 ml brandy for soaking the cake
- Confectioner’s sugar
Preheat the oven to 350 degrees Fahrenheit. Lightly grease a 12×15 inch rectangular cake pan.
Whisk the ground almonds, matzo meal and salt together in a large size bowl.
Lightly whisk the oil, egg yolks, sugars, vanilla, almond extract and 75 ml brandy in another bowl.
Beat the egg whites in a small deep bowl till stiff.
Stir the oil-egg yolk-sugar mixture into the almond mixture. Fold 1/3 of the egg whites into the batter, then fold in the rest. Pour the mixture into the prepared cake pan and bake for 30 mins till nicely set and lightly browned. (Mine took longer than 30 mins.)
Remove the cake from the oven and soak it with the rest of the brandy (A little spray bottle would work well, or you could just sprinkle or brush it – I still haven’t figured out the best way to do this). Pop it back into the oven for another 10 minutes, then remove it to a rack to cool.
Cool the cake in the pan. When completely cool, sprinkle with confectioner’s sugar. To serve, cut into squares in the pan, and use a tiny cookie spatula to remove the pieces carefully.
This is a cookie spatula
So is this


A Tale of Three Cakes

For almost two weeks now, I’ve been playing with the recipe for this Devil’s Food Cake with Mocha Frosting. My daughter Natalie had requested the cake for her birthday, having remembered it fondly from a family dinner earlier this year. The recipe, from my mother in law Irene‘s old Kitchen Aid Mixer booklet, looked straightforward, and included exact mixer speeds and times for beating at each step. Making it, I figured, would be a piece of cake.
Cake #1
The first time I made the cake, other than using extra-large eggs (the only ones we had in the fridge), I followed the recipe instructions exactly, including sifting the cake flour before and after measuring it. I ended up with a very large amount of fluffy batter which overflowed two 9-inch layer pans as it rose into deliciously moist but structureless layers that split when I took them from the pan. I cemented the cake together with frosting and served it at Natlie’s birthday bowling party – the kids loved it.
I, on the other hand, was not so pleased. This patched-up mess was not up to my usual standards. I needed to try it again.

Cake #2
Assuming that the problem had simply been the too-large size of the eggs, I made the cake again 3 days later for Natalie’s birthday dinner, this time using large eggs. I was surprised to once more end up with an unusually large volume of batter. Having learned the hard way just how well burned cake batter sticks to the bottom of the oven, I got smart and used 10 inch pans this time. The final product was yet another very moist but very crumbly cake that literally fell apart as the girls and I lay the top layer onto the bottom. Laughing, we patched it up as best as we could. It looked a bit sad, but tasted great.

I had two theories this time. One was that I hadn’t let the cakes cool enough before moving and frosting them. The other was that perhaps my oven was slow. I couldn’t imagine any other reason for the high batter volume and fragile final product.
Cake #3
A night at my mother-in-law Irene’s home and a promise to bring dessert to Christmas dinner provided me one more chance to get this cake right. After all, Irene had given me the recipe – surely she could help me figure out what I was doing wrong.
I explained to Irene that I had followed her recipe exacly, only varying the pan sizes. “Exactly?” she asked. Yes, I replied, including sifting the flour twice. Why wasn’t my cake as nice as hers?
Turns out Irene hadn’t actually followed the recipe she had sent me.”I never sift my flour”, she told me.”That’s how my mother taught me.” And as for the beating times, well, they were too long as far as she was concerned.
Now it all made sense. By sifting it the first time, I was likely ending up with less flour after measuring. Sifting a second time aerated the ingredients even more, as did beating for the long periods of time noted in the recipe. No wonder the batter was so fluffy. It was half air!
So Irene and I made the cake together. We did not sift the flour, and our beat times were about half that which the recipe advised. We ended up with exactly enough batter for two 9 inch pans, and this time, I let the cakes cool completely before removing them from the pan. The layers were denser than their predecessors, but still very light, and although a fair amount of crumbs graced the lower edges, the layers held together beautifully.
And finally the cake looked as wonderful as it tasted. Pretty enough to earn a crown of bittersweet chocolate shavings. And a doily.

Rich Devil’s Food Cake with Mocha Frosting
The quantities are straight from the Kichen-Aid booklet, with a single addition of expresso powder for added flavor. If you don’t use a Kitchenaid Mixer, ignore the speed numbers and use an approximate corresponding speed on your own mixer. (1 is low, 10 is high). If you make it, let me know how it turns out.
3 squares unsweetened chocolate
¾ cup hot water
¾ cup butter
1 tbsp instant expresso powder
2 cups brown sugar
3 eggs
2 ¼ cups UN-sifted cake flour
1 ½ tsps baking soda
¾ tsp. baking powder
¾ tsp. salt
¾ cup buttermilk
1 ½ tsps. vanilla
Bittersweet chocolate shavings (optional topping)
Combine chocolate, expresso powder and hot water in a small saucepan. Cook over low heat, stirring constantly, until chocolate melts and is smooth. Set aside until mixture cools.
Cream butter in bowl for 1 minute at speed 6. Add sugar and beat at speed 6 for 1-2 minutes. Stop and crape sides of bowl using a rubber spatula. Turn to Speed 4 and add eggs, one at a time, beating after each addition till just incorporated, about 30 seconds, scraping the bowl when needed. Add cooled chocolate. Turn to Speed 4 and beat about 30 seconds. Stop and scrape bowl.
Sift together cake flour, baking soda, baking powder, and salt; set aside. Combine buttermilk and vanilla. Turn to Speed 2 and add 1/3 flour mixture and bea till incorporataed, just a few seconds. Still beating, pour in 1/2 the liquid, then another thirdflour, the second half liquid, and finally the last third of the flour, beating as little as possible until just combined, stopping and scraping the sides when needed.
Pour batter into two greased and floured 9 inch round cake pans. (Before flouring, cut a nine inch round of waxed or parchment paper and place on greased bottom of pan. Then grease the paper and flour pan.) Bake at 350 degrees for 25 to 30 minutes. Cool in pans 10 minutes, then invert pans on wire rack, remove waxed paper and let cakes cool completely before icing with mocha frosting. Sprinkle the top with bittersweet chocolate shavings.
Mocha Frosting
¾ cup butter
1 tbsp instant espresso or coffee granules
1 tbsp. Hot water
1 tsp. vanilla
3 ½ cups powdered sugar
4 tbsps heavy cream
Dissolve coffee granules in hot water. Set aside until cool. Place butter in bowl. Turn to Speed 6 and cream for 1 minute. Do not overbeat or it will melt. Stop and scrape bowl. Add cooled expresso and vanilla to butter. Cream 30 seconds. Stop and scrape bowl
Add powdered sugar, ½ cup at a time, beating 30 seconds after each addition. Stop and scrape bowl. Add cream and beat on Speed 4 for 2 minutes, until fluffy. If frosting is too soft, refrigerate for a while before frosting cake.
Place 1st layer on cake plate upside down and frost. Place 2nd layer on top and frost top and sides.
COMMENTS
- Surgeon in my dreams says: EditThey look sooooo good!!Reply
rlbates says: EditCan almost taste them!Reply
Cookies for an Afternoon Concert
 Every year, my friend and pianist/artist Ellen Farren gives a recital at her apartment, a preparatory rehearsal for an annual performance she gives with New York Philharmonic violinist Fiona Simon.
It feels so special to be allowed into the private world of musicians, and to enjoy such amazing music in the comfort of a friend’s home. Fiona and Ellen played with untiring energy, tackling two lesser known pieces by Benjamin Britten and Dvorak, as well as a more familiar Schubert. When Fiona played a Bach violin solo, I felt transported back to the salons of Europe. The concert ended with an encore of Spanish music.
I wanted to do something to thank Ellen for the privilege of attending yesterday’s concert, so I brought some cookies. This is a variation on a raspberry cookie recipe from Irene, born out of necessity when I discovered at the last minute that I had no raspberry preserves but lucked upon a jar of fig jam in the fridge.
The combo of figs and chocolate was rich but not too sweet, and went well with the delicious array of cheeses, spreads and pates that Ellen served after the concert. I only wish I could have stayed a little longer to talk a bit more with everyone. And watch the Yankees -Red Sox Game, which Ellen made certain her husband turned back on as soon as the concert was over.
Wonderful music, good food, great wine, good conversation and the Yankees – Yep, I’d say that’s a really special New York afternoon.
Chocolate Fig Bars
¾ cup light brown sugar
1 cup all purpose flour
1 stick unsalted butter in 8 pieces
1 tsp. Vanilla extract
¼ cup Fig jam
2 oz. Bittersweet chocolate in pieces
2 large egg whites, at room temperature
½ cup blanched whole almonds
Confectioners’ sugar, for garnish
Preheat the oven to 350 degrees fahrenheit.
Process the lemon zest with ¼ cup brown sugar with the metal blade of a food processor until the zest I as fine as the sugar, about 1 minute. Add the flour, butter, and vanilla and process until the mixture resembles coarse crumbs, about 10 seconds.
Press into an ungreased 9-inch square baking pan and bake in the preheated oven until it begins to color, about 15 minutes.
Remove the crust from the oven and lower the temperature to 325 degrees.Let crust cool a few minutes to harden up a bit.
If the fig jam has large lumps of fig, pulse it a few times on the food processor. Then spread the jam on the cookie crust, leaving a ½ inch border on all sides.
Pulse the chocolate 4 times, then process until chopped finely, about 1 minute. Sprinkle over the jam.
Beat the egg whites in a clean, dry bowl with an electric hand mixer until stiff peaks form. Reserve.
Chop the almonds finely with the remaining ½ cup brown sugar with the metal blade, about 15 seconds. Add the egg whites and pulse until just combined, about 3 times.
Spread on top of the chocolate layer and bake in the preheated oven until lightly browned, about 25 minutes. Cool. Sprinkle with the confectioners’ sugar, cut into squares and serve.
Note – For a thinner cookie, use a 9×12 inch glass pan.
Apple Torte
 Thanks for Bureka Boy for a marvelous recipe, and as usual, a great how-to that makes baking gorgeous desserts like this a snap.I brought the torte to a Hanukkah dinner party tonight, and it was a huge hit with all ages. (Hint- keep the sides on the springform pan for risk-free transport.)
Go ahead, try it. It’s not hard to make at all….
European Apple Torte
I strongly encourage you to read the recipe at Bureka Boy’s site – it’s complete with beautiful prep photos and hand holding instructions. I’m putting an abbreviated version here for easy printing.
Crust Ingredients
- 1/2 c butter, soft
- 1/3 c sugar
- 1 pkg vanilla sugar, optional
- 1/2 tsp vanilla
- 1/8 tsp salt
- 1 c all purpose flour
Cheese layer ingredients:
- 1 pkg (8 oz/25o g) cream cheese, room temp.
- 1 tbsp lemon juice
- 1 tsp vanilla
- 1/4 c sugar
- 1 egg
Apple layer ingredients:
- 2 large baking apples* (plus 1 extra, just in case)
- 1/3 c sugar
- 1/2 – 3/4 tsp cinnamon
- 1/4 c sliced almonds
Crust: In a large mixing bowel using the paddle, together the butter, vanilla, sugar and salt. Mix until well blended. Add the flour and mix only until blended. Place the dough in an ungreased 8 1/2″ springform pan. Pat and press the dough evenly across the bottom of the pan and up the sides about 1 1/2 inches. make sure it is even. And not too thick between the bottom of the crust and the walls of it. You will think you don’t have enough dough, but trust me, you do. Just keep working it and thin it out to cover. Set aside.
Cheese filling : Mix everything together in a medium sized bowl using the paddle for 2 or 3 minutes. It needs to be perfectly smooth and not grainy. Place the cheese filling in the unbaked crust, smoothing it using a rubber spatula. Set aside.
Preheat the oven to 450F at this point.
Apple layer: Peel and slice the apples 1/8 inch think. Layer the apples around the outer perimeter, carefully overlapping them. When you get to the first apple you layered, lift it to add the last one. Repeat a second layer just inside the first. Arrange the few apple slices in the innermost layer nicely. Mix the sugar and cinnamon together and with a spoon, distribute the mixture evenly all over the apples.. It will look like too much – don’t worry it is not. Finally, sprinkle the almonds evenly over the apples.
Bake for 10 minutes only @ 450 F and then reduce the heat right away to 400 F and cook for another 25 minutes. Remove from the oven to a baking rack and let cool completely. Gently run a knife around the cooled torte and release the spring siding. Let the torte sit several hours in the fridge for it to firm up properly before eating it. It is best served slightly cold or at room temperature. Dust with confectioners sugar if you like or serve with whipped cream dollops. I serve mine plain.
Cookies from an Angel
 I’ve been invited to submit a recipe to Leonard Lopate’s Holiday Cookie Recipe Swap. I love Leonard’s radio program, so it was a thrill to get the email from his staff asking that I submit a recipe and help spread the word about the swap.
Picking a recipe was easy – Angel Fingers. When I was little, my Grandma made Angel Fingers at Christmas, along with shaped sugar cookies and a wonderful, crisp brown cookie she called a “Sand Tart”. I loved them all, but I only have the Angel Fingers recipe, handwritten by Grandma on an index card that is becoming increasingly yellowed with age.
My dad’s mom was a one of a kind. Never afraid to speak her mind, she was famous for such lines as “You have such lovely teeth! Are they your own?” and to her parish priest “If I’d known you when you were younger, you’d never have made it to the Cemetery.”(She of course meant to say Seminary.)
My Grandma loved her garden, her little bird, her crossword puzzles and the Phillies. And she could stand on her head even in her early 60’s, a skill she demonstrated to us during sleepovers at her house after we did her nightly calisthenics with her.
Grandma held a much less strict view on Catholicism than my parents, who insisted we attend church every single Sunday while I was growing up. And so I will never forget that Sunday morning when I came downstairs after spending the night and Grandma told me we were skipping Mass that day.
“God is in the birds, the trees and the flowers”, she said, spreading her arms out toward her garden. “We don’t need to go into a building to be with him.” So we sat on her porch that beautiful sunny morning looking at the garden, listening to the birds and reading the funnies.
I don’t go to church anymore now, having lost organized religion long ago. But I never lost my Grandma’s religion. I still believe that God is in the flowers, the trees and the birds.
And he’s also in these little cookies – cookies from my Grandma, who taught me to see holiness in the world around me.
Angel Fingers
 Submit your favorite holiday cookie recipe by December 6, along with the reason why the recipe is special. Then tune in to WNYC on December 11 and listen to Leonard and Ruth Reichl talk cookies.
Autumn Cookies
 Maria is asking me for an easy, fast recipe for a special autumn treat to give out to her friends to celebrate this wonderful season. Here ya’ go, Maria…
Assuming you have a food processor, these cookies are both easy and fast. You can make a batch in a single sheet pan, so no problems with your small oven. I can put together a batch in about 25-30 minutes, which is also the cooking time. So, if you do back-to-back batches, you can crank out quite a few cookies in an evening. Plus, they store well either in an airtight container or in the freezer. Put wax paper between layers in a rubbermaid or tupperware box.
KRUNCHIES
This is Irene’s recipe, I’m not sure where she got it. I used a combo of walnuts and pecans in this batch, and made them in a 9 1/2 by 12 inch cookie pan, but they were a little too thick for my taste. You should make them as directed below in a 13 x 18 inch cookie sheet – you’ll get more cookies, and they’ll be thinner and crisper.
2 cups flour
¼ tsp. salt
1 cup sugar
½ tsp. cinnamon
2 sticks cold butter
1 egg, separated
1 tsp. vanilla extract
1 cup finely chopped nuts (pecans, filberts, almonds, pistachios, in any combination)
In food processor mix flour, salt, sugar and cinnamon. Pulse several times to mix. Cut each stick of butter into 8 pieces and add to flour mixture. Pulse until crumbly. Add egg yolk and vanilla and process until dough forms a ball.
Pat thin on large (13 x 18 in) cookie sheet with sides. Smear surface of dough with unbeaten egg white. Pour off excess egg white. Sprinkle evenly with chopped nuts.
Bake in pre-heated 350 degree oven for 20 to 25 minutes till lightly browned. Check at 15 minutes to keep from burning.
Remove from oven and cut in squares while they are hot (I use a pizza cutter), then place the cookie sheet on a rack to cool. When cooled, carefully lift the cookies out using a narrow spatula to avoid breaking them.
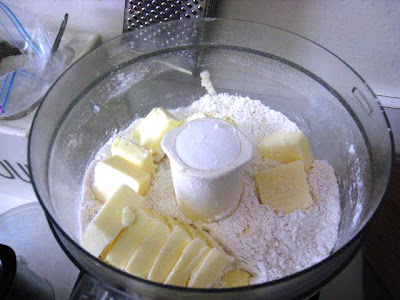
Pate Brisee
 Pate Brise (from Pleasures of Cooking)
You won’t find an easier crust to make or work with than this. This recipe is for a partially cooked pie crust to be used with a quiche type tart. If using for pies or fruit tarts, don’t pre-bake. Just roll out into pan and fill.
1 2/3 cups unbleached, all-purpose flour
1 tbsp. sugar
1/8 tsp. salt
12 tbsps. unsalted butter
4 ½ tbsps. ice water
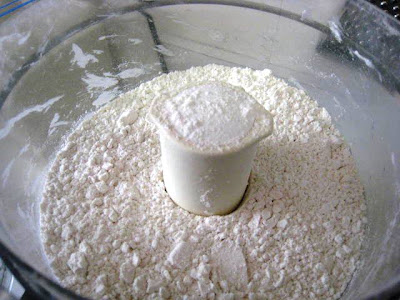
Process the flour, sugar, salt, and butter to the consistency of coarse meal, about 10 seconds.
Pour ice water through feed tube while processing. Stop motor as soon as dough begins to form a ball.
Turn out onto a lightly floured surface and shape into a disc about 1 inch thick.
Roll dough into a 15 inch circle and fit it into an 11 inch tart pan with removable bottom. Prick all over with a fork and refrigerate about 25 minutes or until ready to bake.
Preheat the oven to 425 degrees. Cover the shell completely with a round of aluminum foil and fill with 2 cups uncooked rice or beans. Bake for 15 minutes. Carefully remove the foil and weights. Bake 5 minutes more, or until golden. Let cool before filling.
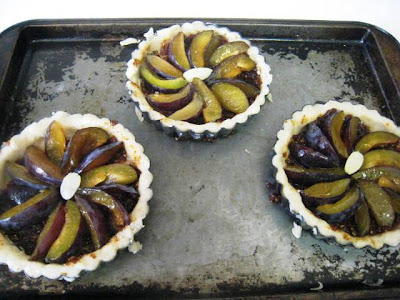
Fig and Plum Tartlets for an Almost Perfect Day
 The three couples were first drawn together by our daughters, a treo of 11 year olds who walk together to school every morning. But it’s more than the kids now – it’s a shared love of good food and wine, of different cultures (Greek, Jewish, Christian), of politics and a dream of one day all living in a European city, probably Paris. We are two doctors, a teacher, a psychologist, and a Greek scholar and an actress turned pet store owners. And, oh yes, seven children.
We get our families together for dinner every few months or so. Tonight, I’ve promised to bring dessert.
I sleep late because I have a migraine (I said it was an almost perfect day…), and Mr TBTAM beings me a cup of coffee while I am in the shower waiting for the Imitrex to kick in. It does, and I spend the rest of the morning looking at recipes and cookbooks, deciding what to make for dessert.
Mr TBTAM has brought home a big box of gorgeous plums from Costco, and there are some mission figs on the verge of becoming too dry to eat alone. Although I am certain the flavors will go well together, I can find no recipe for a fig-prune tart. So I decide to create my own.
Natalie helps me in the kitchen, and we spend the early afternoon baking. This is followed by a late afternoon bike ride in Central Park with Mr. TBTAM and then a wonderful dinner with our friends.
Yep, it’s been pretty much an almost perfect day.
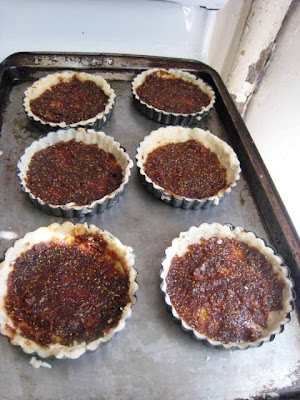
Fig and Plum Tartlets
Makes 6 -4 inch tartlets
Fig Base
12 dried figs
3 tbsp sugar
1 tsp lemon juice
2 tbsp Calvados brandy
Pate Brisee
1 2/3 cups unbleached, all-purpose flour
1 tbsp. sugar
1/8 tsp. salt
12 tbsps. unsalted butter
4 ½ tbsps. ice water
Tart filling
(This is what I used for these tarts, next time I would increase to 3 plums per tart)
12 plums, halved, pitted and sliced
1/4 cup sugar
Topping
Sliced almonds
Vanilla Ice Cream for serving
____________________________________________
Remove the stems and chop the figs.
 Toss the figs with 3 tbsp sugar in a small saucepan.
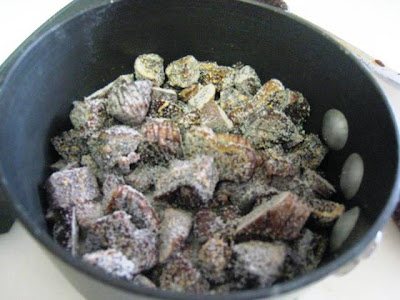 Add 1/4 cup water and a squeeze of lemon to the figs and cook over very low heat for 15 minutes.
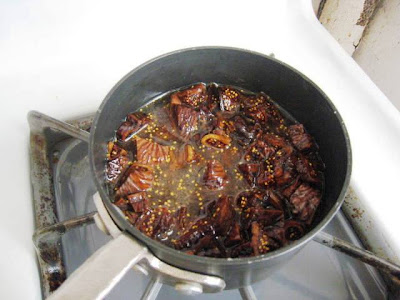 Add 2 tbsp calvados (and a bit more water if necessary to keep from drying out), and cook till figs are soft, about 15 munutes more.
 Remove from heat and let sit a few minutes to cool. Process in food processor a few seconds until smooth.
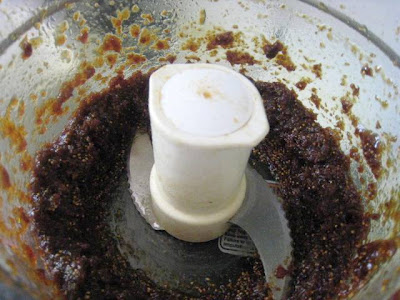 Set aside (and try not to eat any…)
 Make pate brisee.
 Process the flour, sugar and salt in a food processor to mix. Cut butter into pieces and add to the processor.
 Pulse to the consistency of coarse meal, about 10 seconds.
 Pour ice water through feed tube while processing. Stop motor as soon as dough begins to form a ball.
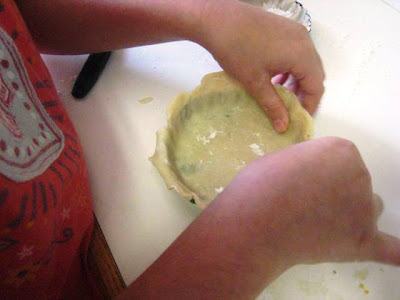
 Turn out onto a lightly floured surface and shape into a disc about 1 inch thick. (Can be made ahead and refrigerated.) Cut into 6 equal pieces. Flatten each piece into a disc about 4 inches round, then place into tart pan and, using your fingers, press the dough up the sides of the pan and across the bottom evenly.
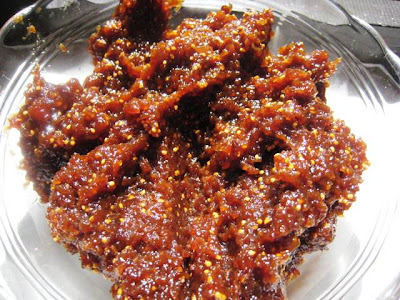
 Using a small rubber spatula, spread about 2 tbsp fig paste across the base of each tartlet.

 Toss the plum slices with 1/4 cup sugar
 and arrange them, overlapping slightly, in the tartlet pans. Place an almond slice in the middle.
 You could do an eggwash on the crusts at this time – I forgot to do it.
Bake at 400 degees for 10 minutes. Lower heat to 350 and bake an additional 40 minutes, till the fruit is soft and bubbly and the crust is golden brown.
 Serve warm or at room temperature with vanilla ice cream on the side.

Chamomile Tea Squares
 Here is my first contribution to Kalyn’s Kitchen Weekend Herb Blogging.
I love chamomile. The plant itself is easy to grow in pots, and has cute little daisy-like flowers that are harvested for tea. It is known for it’s calming properties, and I do find that a cup makes me feel a bit less harried. Chamomile tea straight can be bitter unless it is sweetened or mixed with other teas. I usually drink it unsweetened in a mixture by Tazo called Calm.
I thought that the sweetness of a cookie might be just the right balance for straight chamomile’s bitterness. I modified a classic lemon square recipe, figuring if it worked for the bitter lemon, it would work for chamomile. And it did.
This cookie is actually quite sweet – maybe a bit too sweet for my tastes, though my hubby and kids liked it just fine, thank you. (I’m the one looking for the pucker on my lemon cookies, so you know where my tastes stand.)
Next time, I might use a little less sugar in the filling and I might also use this crust, which is less sweet. I noticed that some lemon square recipes call for baking powder in the filling, and wonder if that would give me a firmer middle without having to bake it so long.
So consider this a work in progress, though not bad for a start.
Chamomile Tea Squares
Vary the strength of the tea depending on how much you like chamomile. Next time I am going much stronger – not everyone could taste that the chamomile. You can really make these with any tea. I want to try Earl Grey next.
Tea
Add one chamomile tea bag to ½ cup boiling water in a pyrex glass measuring cup. (For stronger, use 2 bags and 2 cups of water, steep and then boil it down to 1/4 cup) Let steep. Remove tea bag, pressing against side of cup as you remove it. Discard tea bag. Let tea cool. (You will only be using ¼ cup of this tea, so dilute what’s left over with some hot water and have a cup..).ADDENDUM: neighbors and eldest daughter’s friend could not taste the chamomile, though they loved the cookies. So I recommend making the tea even stronger – Maybe make two cups using 3 bags and then boil it down to 1/4 cup)
Crust:
1 cup all purpose flour
1/2 cup confectioners’ sugar
1/8 tsp salt
4 ounces (1 stick) unsalted butter, cold and cut into 1/2 inch pieces
Filling
2 large eggs
1 cup sugar
2 tbsp all purpose flour
1/8 tsp salt
1/4 cup chamomile tea
Topping
Sifted Confectioner’s sugar
Preheat oven to 350F. Butter and line an 8-inch square pan with parchment paper.
Combine flour, confectioners’ sugar and salt in the bowl of a food processor. Add butter and pulse until the mixture is pebbly. Press evenly into the bottom of your prepared pan. Bake until lightly golden, about 15-20 minutes. Set aside to cool.
Whisk together sugar, flour and salt. Add eggs and whisk until smooth. Whisk in the tea. Pour over crust. Bake until filling is just set, about 2o minutes. Cool completely. Dust with confectioners sugar and cut into squares.
Drop Down Menus – and a Pear Chocolate Tart
Hey, check out my new drop down menus over there in the sidebar. They’re so high tech, so clean, so feng shui. I’m having such a good time making them, and guess what? They’re easy as pie if you have the new version of Blogger. Thanks to Technical Bliss for the how-to’s. And speaking of pie…

Pear Chocolate Tart
Make a pie crust in a tart pan. Let cool. (I used Eggbeater’s pie crust recipe. Thanks Shuna!)
6 oz semisweet chocolate
2 tbsp butter
1/2 cup apricot preserves
1 1/2 oz cognac or brandy
6 pear halves (either canned and drained, or poahced or fresh, soft and ripe as I used today)
Melt chocolate with butter in top of double boiler. Spoon chocolate ontom pie mshell and spread until smooth. Let cool till chocolate hardens.
Melt preserves on low heat. Add cognac and simmer for 3 mins. Strain. (Enjoy the solids yourself!)
Cut pears crosswise into slices. Arrange pieces on tart to from spokes of a wheel. Brush tart with glaze and let sit.
Serve slices with a bit of vanilla ice cream.
A Brazilian Thanksgiving Eve : Moqueca de camarão, Mango & Avocado Salad and Pudim de leite
 I know, I know. It’s ridiculous. But every year, on the night before Thanksgiving, we have a dinner party.
You see, my friend Andy and his daughter are clowns in the Macy’s Thanksgiving Day Parade. So their family stays with us the night before in order to be able to get to the parade on time (5:30 am for the clowns), and we all have a nice dinner together. For the past two years, our friends in from Maine have also joined us. It’s a wonderful, low-key evening, and I look forward to it every year. I try (usually unsuccessfully) to keep the fare light, and we all try to end the evening early so the clowns can get to bed.
Of course, part of the reason I can enjoy Thanksgiving Eve is that I do not have to cook dinner the next day. We head to Philly on Thursday morning, and tag team two family back-to-back dinners. (Don’t ask… ) I usually bake a pie and bring some sides, but that’s the limit of my responsibility.
This year’s Thanksgiving Eve dinner was a challenge. Isabelle cannot have anything fermented or with cow’s milk, and one of the kids is now a vegetarian. It took awhile, but I finally hit on the perfect menu – Brazilian fish stew (most of which is made ahead), and mango and avocado salad with a lime vinaigrette. Dessert was flan with fruit. (Oops, Isabelle. I got so caught up with the Brazilian theme I forgot about the milk. Did you even have dessert?) We served a white pinot, but I don’t know if this was the best choice of wine. Suggestions are welcome…
The kids set the table with the fancy dishes, and we put up votive candles all around the apartment. Emily S. Arrived early and helped us set up the appetizers (Thanks, E.S.!), which were crostini topped with chopped liver or white bean and sage puree, olives, baby carrots, apple slices, roasted peppers in oil and a wonderful sheep’s milk cheese from Fairway.
I had a great time. This year, the clowns were in bed by 10:30 – not too bad – and the rest of us hit the sack by 11:30. Thanks, Linda for doing the dishes. We missed you Sam, but hope to see you at Christmas. Happy Thanksgiving!
 Moqueca de camarao (Brazilian Fish Stew) (See original recipe at Epicurious.com)
This goes down in culinary history as one of the best dishes I have ever had. It’s a great dish to make to amaze your friends, and so easy.
The original recipe calls for pureeing the diced tomatoes, but I chose to keep them whole. I’ve also re-written the recipe to reflect how I prepared it ahead. If you are making it just for yourself, and not ahead of time, use the Epicurious version. I was not able to find dende oil (red palm oil) at my usual sources (Fairway and Gourmet Garage), but am determined to get it before I make this again. I cannot imagine this stew could taste any better than it already does, but from what I have read, that oil puts the flavors over the top.
Sauce
1 1/2 tablespoons olive oil
1 medium onion, finely chopped
1 green bell pepper, finely chopped
1/2 teaspoon cayenne
1 tsp salt
1 tablespoon coarsely chopped fresh cilantro
1 (14- to 15-oz) can diced tomatoes including juice
1 cup well-stirred canned unsweetened coconut milk (to be added just before adding shrimp)
Shrimp marinade
1 1/4 lb large shrimp in shell (21 to 25 per lb), peeled and deveined
1/4 teaspoon black pepper
1/2 teaspoons salt
2 garlic cloves, minced
1/4 cup fresh lemon juice
Last-Minute Additions
1 tablespoon dende (palm) oil
4 tbsp coarsely chopped cilantro
Accompaniment
Cooked white rice (I used Basmati)
Cook onion and bell pepper in olive oil in a 12-inch heavy skillet over moderately low heat, stirring, until softened, 8 to 10 minutes. Add cayenne, 1 tablespoon cilantro, and 1 teaspoon salt and cook, stirring, 1 minute. Add tomatoes and simmer briskly, stirring, until mixture is very thick, about 15-30 minutes.
Make marinade and keep, covered, in the fridge till you are ready to use it.
About 40 minutes before serving, start your rice cooking. Then toss shrimp with marinade in a large bowl, and let sit in fridge, covered, for about 20 minutes. (Not any longer, or you will have ceviche).
5-10 minutes before serving, stir coconut milk into sauce and bring to a boil. Add shrimp mixture and cook, stirring, until shrimp are just cooked through, about 3 to 5 minutes. Stir in dende oil and remaining 4 tablespoons cilantro and season with salt and pepper.
Plate individually, first putting rice into a small bowl, then inverting it onto the plate. Spoon the stew over the rice. Keep bowls of stew and rice on the table, though – everyone will want seconds!
Mango and avocado Salad with Lime and Honey Vinaigrette
salad greens (We mixed red lettuce with mesclun)
large ripe mango, halved, pitted, peeled, sliced
2 small avocados, halved, pitted, peeled, sliced
Juice of 1/2 lime
3 tbsp honey (Depends on how tart or sweet you like it.)
1 tbsp hot water
½ cup olive oil
Salt
Pepper
Whisk the honey and lime together with the hot water. Gradually whisk in the olive oil. Season with salt and pepper to taste. Toss greens with ¾ of the dressing. Arrange mango and avocado on top of greens and drizzle remaining dressing over them.
Pudim de Leite (Brazilian Flan)
There are many ways to make flan. Some recipes use eggs, others add corn starch or use cream instead of milk. All start with caramelized sugar, which forms the base (and later, the top) of the dish. This is the Brazilian version, from Maria Brazil web site, with a few modifications on my part. You can use a ring mold if you are being traditional. I used a Pyrex glass dish.
1 cup sugar (for the caramel)
1 12-oz cans sweetened condensed milk
Equal volume of regular milk (use the can to measure)
3 eggs
1 quart strawberries, washed and drained
Lovely cookies
Place 1 to 2 inches of water in a large roasting pan. Place the pan in the oven and preheat to 325°.
Put the sugar into a heavy saucepan. Heat over medium high heat, stirring almost constantly, until the sugar melts into a golden brown caramel. (Watch carefully, it goes slowly, then turns color quickly.)
Pour carefully into pyrex dish or mold. (Listen for cracking noises as the sugar cools and cracks!) and spoon it a bit up the sides of the dish. Be careful not to burn the sugar and yourself. Let it cool.
Whisk together the condensed milk, regular milk and eggs. Pour this mixture through a fine sieve into your prepared dish. (This gets any little egg lumps out).
Place the dish carefully into the center of the roasting pan with water. Bake for about 1 hour. (You will know it is done when you can insert a knife inserted into the center without the custard pooling into the defect you made.) Carefully remove the dish, Let it cool to room temperature and then place in refrigerator for at least 6 hours or overnight.
Just before serving, run the tip of a knife around the inside of the mold. Place a deep platter over the mold and invert: the flan should slide out easily. If not, give the mold a firm but careful shake. Cut into squares. Plate with a spoon of caramel sauce on top, two strawberries and a little cookie.
Serves about 10.
Category: Food
Kugel Calories

It’s Rosh Hashana, the Jewish New Year, and as usual, we gather with Mr TBTAM’s family on the Saturday evening that is nearest to the actual holiday – a little custom I like to call “Celebrating the High Holy Days of Convenience.” It’s not exactly kosher, but it is sensible, and I highly recommend it for families spread between two cities – in our case, those cities being New York and Philadelphia. Everyone is always able to come to dinner, and those who want can still celebrate with their spouses’ families on the proper day so no one feels slighted. The only downside to the custom is that if you do this at Passover, and are not careful, you can end up doing 3 Seders. This I do not recommend, especially if you have small children.
Dinner tonight was a group effort, with everyone making or bringing something. I made mushroom barley soup, Mr TBTAM made cucumber salad, Irene made the desserts and the top rib (didn’t you know top rib is the new brisket?), Mr TBTAM’s sister made the potatoes and the veggies, his cousin brought the Challah, and our niece made the Kugel (with Grandma’s help).
I don’t have time to share all the recipes, so I chose just one. This wonderfully delicious Kugel recipe came to Irene from a friend some years ago, although she has of course modified it. As she says, it is really more of a soufflé than a kugel, with a few noodles thrown in to keep it legit. It is deceptively light, its levity belying the ridiculously high fat content of its ingredients. However, I did a little calculating and was pleasantly surprised to find out that if you cut this recipe into 30 pieces, as we did, then each piece is only 154 calories!
So go on, have a piece (or two). It will give you a little extra fuel for your fast next week on Yom Kippur. For those of you who do not plan to fast, you can head over to Kalyn’s Kitchen for a little South Beach Diet atonement.
Happy New Year!
———————————————–
KUGEL
8 large eggs
½ lb. cream cheese, room temperature, cut in small pieces
½ lb. melted butter, cooled
2 tsps. vanilla extract
1 pint sour cream
½ tsp. salt
½ cup sugar
3 cups fine egg noodles, cooked (about 2 cups uncooked)
½ cup raisins (optional)
In mixer beat the cream cheese until smooth. Add eggs and beat for 15 minutes. Add sugar, melted butter, sour cream, salt and vanilla extract and continue beating until smooth and well mixed. Fold in the cooked noodles and raisins. Pour into a greased 9 by 13 inch baking pan. Bake in 350 degree oven for 50 to 60 minutes until just set. Allow to cool a little before cutting into squares. Check at 45 minutes. Depending on your oven it can get over done, especially if you use a pyrex pan, so watch it carefully.
Category: Food
What’s Best? Blueberry Cake w/ Lemon Sauce

What could be better than fresh Vermont blueberries you stopped to pick along the way home from picking your daughter up at camp?
How about getting this wonderful little cookbook (© 1951) from said daughter, who bought it for you at a thrift shop in Brattleboro while on a camp field trip?

Or better yet, how about finding in that cookbook an amazing recipe for blueberry cake with lemon sauce?

But do you know what’s really best of all? I’ll tell you…
Blogging again, that’s what!
Blueberry Cake with Lemon Sauce
This was hands down the lightest, moistest cake I’ve ever made. It may have been the fact that today was incredibly hot yet not very humid. Or that I really did sift the dry ingredients three times. I’ll have to try the recipe again on a cooler day and see if I get the same results. And the lemon sauce – to die for. Let me know if you can think of other uses for this sauce. It is truly special – the combo of lemon and nutmeg really works.
1 1/2 cups fresh blueberries
2 cups flour
2 tsp baking powder
1/4 tsp salt (I used a scant 1/2 tsp kosher salt)
1/2 tsp cinammon (I accidentally left it out, and it was fine)
1/2 cup butter
1 cup sugar
2 eggs, separated
2/3 cup milk
Lemon Sauce (recipe follows)
- Wash and drain berries. Dust with 2 tbsp of the flour.
- Sift dry ingredients, including remaining flour, 3 times.
- Cream butter until light, add sugar gradually, and beat until thick and lemon-colored.
- Add well beaten egg yolks. (I didn’t beat first, just added them one at a time.)
- Alternately, add milk with dry ingredients, beating well. (I beat just enough to incorporate, being careful not to overbeat.)
- Fold in stiffly beaten egg whites.
- Fold in blueberries.
- Bake in a well-buttered and floured 8×8 inch cake pan about 35 mins in 350 degree oven. (I ended up with too much batter for this pan, that’s how light this cake ended up. I had to cook it a little longer to get the middle set. Next time I will use a slightly larger pan.)
- Remove and let stand 5 minutes before removing to wire rack.
- Serve hot with lemon sauce.
Lemon Sauce
Cook 1/2 cup sugar and 1 tbsp flour in1 cup boiling water over double boiler for 10 minutes (I ended up putting it directly over heat to thicken it up). Add 1/2 tsp nutmeg, 2 tbsp butter, and the juice and grated rind of 1/2 lemon.
Category: Food